Tutorial: ZBrush – Using Dynamesh
- Michael
- Jan 19, 2016
- 3 min read
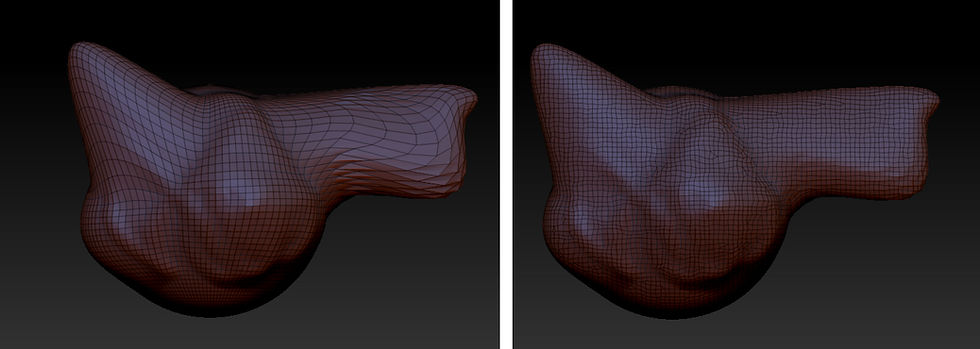
Dynamesh is a feature used in ZBrush to instantly regenerate a workable topology over the surface of your currently selected Tool or subtool. As you sculpt, particularly in low resolution meshes your polys will become stretched and distorted, making further sculpting difficult. This topology is not intended for exporting to a rendering or animating software, but is instead merely a clean surface on which to continue sculpting.
It is useful at the very start of your sculpt as you can quickly pull and stretch a simple sphere into a rough shape for your model, before dynameshing it into something reworkable.

Dynamesh is intended for use at the early stages for blocking out big main shapes – the topology it generates is uneven, with wavy lines and triangles, so it isn’t clean to model details on.
Following the Dynamesh stage, you should use Z-Remesher to create a neater, more uniform topology which is much more appropriate for detail sculpting. A Tutorial for ZRemesher can be found here.
<>
To activate Dynamesh, open the Geometry tool palette and click on the Dynamesh option. Simply click the large Dynamesh button to create your new topology, then continue sculpting.
Over time your polys might distort again, so simply Ctrl + Drag Click the background to reproject a dynamesh over the model.
Once finished the base sculpt, be sure to deactivate Dynamesh mode!
OPTIONS PANEL
There are a few ways to optimiZe your dynamesh, further –

Resolution – The density of the polys generated can be adjusted with this slider. Lower resolution will be processed faster, and can be easier to work with at the earlier stages of sculpting.
Project: If you already have fine details in your sculpt, Click the Project Button in the Dynamesh palette to make the dynamesh wrap better around these – it will help maintain detail rather than smooth it out.
Groups: Check this if you want to keep different meshes in your tool separate. Uncheck it if you want them to merge into one upon activating dynamesh.
Polish: This will smooth out any surface bumps when dynamesh is applied – good for mechanical objects, not so good for organic.
Blur: Blurriness affects how rigidly dynamesh will stick to tight details in the geometry. Keep it low to maintain accuracy.
ADVANCED USES
Merging parts
Dynamesh also has the effect of merging two sections of your subtool together if they overlap. this can be useful for creating loops and holes etc. The image below shows show two intersecting pieces are merged when a dynamesh is applied.

Merging Subtools
Dynamesh can be used to merge two subtools into a single mesh. To do so, follow the steps below.
1: Say you have a monster head tool, and a horn tool, and want to add horns to the monster’s head. Add the head tool to the canvas, then append the Horn as a new subtool. Use the move scale and rotate tools to position the horn as necessary.
2: With the head tool selected, You must first delete any lower Sub-Div Levels. To do this, open the Geometry palette, then click the ‘Del Lower‘ Button. Do the same for the horn.
3: If you have multiple subtools, make sure the horn is below the head in the subtool list, then click Merge Down. The two will be merged as one tool. If they have different materials or polygroups, they will still appear as different colours – dont worry about that.
4: Click the Dynamesh button, Making sure that the ‘Group‘ option next to it is unchecked. This will merge the two meshes together as one. (If the group button was checked, both would be dynameshed as separate meshes, so their edges wouldn’t be joined together. )
Subtracting parts of a mesh – Boolean.
1: With your tool selected and Dynamesh active, open the brush panel and choose any type of ‘insert’ brush – cube, cylinder etc.
2: Hold the Alt button, then drag-click it out over the mesh. The brush will be black and inverted – i.e only the insides will be visible. Transpose it to the correct position.
3: Drag click over an empty part of the canvas to refresh the Dynamesh, and the negative part of the brush will be subtracted.
NB – An alternative way to Boolean is to have your base mesh as one tool, and your subtractive parts as a subtool. Merge tehm together, but switch the blend mode icon in the Subtool layer list from additive to subtractive.
コメント